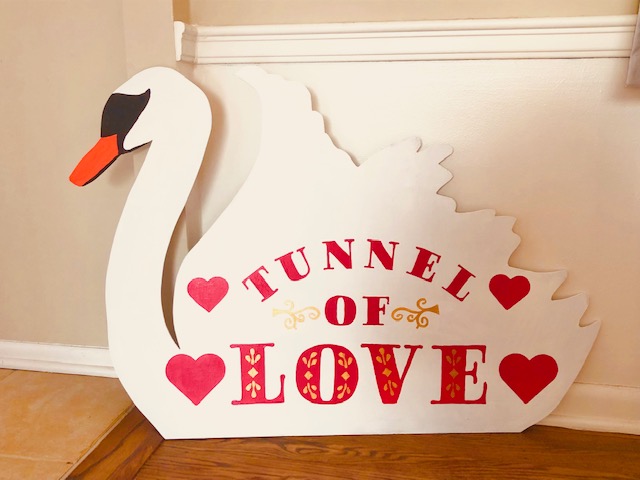
The Schmigadoon Swan

Does anyone else see something in movies or TV that when you see it, you have to have it? In college, it was all about clothes. I remember friends after seeing P.S. I Love You searching long and hard for the Hunter welly boots they wear in the scene where the women are on the lake. Or in Twilight when Bella wore Ugg boots that looked more like beefed up duck boots.
More recently, I've been seeing decor in TV and movies that I want for myself and haven't seen in stores. I've been feeling like every time I go to Target or Joann's, everything just looks the same year after year and I need to take matters into my own hands.
Last summer, we watched Schmigadoon on AppleTV and LOVED IT. The setting and costumes were incredible, but I especially fell in love with the set from the Tunnel of Love scenes. I saw the swan in one scene and just had to have it. It's nothing like anything I've seen in the stores.

I've been making decorations to go outside, and this one could go out there, but I put the conversation hearts out again and felt like anything else would make it look too busy. So inside it will go.
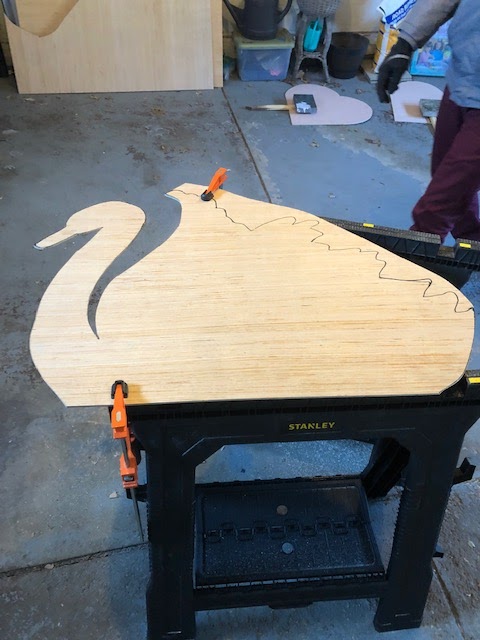
Because of that, I didn't have to worry about drilling holes or attaching stakes to my plywood and only needed to focus on the shape of the swan, cutting, and painting.
I free-handed the shape of the swan which made me nervous. I don't think I'm the best at drawing freehand and I wanted this to be as accurate as possible. I found that flipping the image from Schmigadoon so the head of the swan started on the left helped me a lot for some reason and then it just kind of came together.

After I made my template, I drew it on m plywood and cut, sanded, and applied primer.
I cut my letters and used them as stencils, then carefully colored them in with acrylic paint. I could have probably used vinyl from the Cricut to attach the letters onto the wood, but at the time I was thinking I might sand after painting to give it a vintage look. I still think that would look good, but I also like how it looks newer so I decided to leave it alone. Maybe if I try again I'll make it look more distressed.

I also used the Cricut to make those embellishments on the side of the word 'of' just by searching the word 'embellishment' in the shapes section.
To make the swan's face, I just looked at the original and tried to match it as well as possible - no template from Cricut needed.
After several coats, the swan was complete! It seems complicated and at first it felt that way, but looking back it wasn't as hard as I thought it would be and I'm really happy with the result. It hangs out in my dining room and will until Valentine's Day is over.

Comments
Post a Comment